How to clean up your Windows 10 account
Performing a regular disk-cleaning regimen frees up precious space on your hard drive and helps keep Windows 10 operating smoothly. Follow some or all of these steps for a lean, clean machine.
These days, a relatively clean and uncomplicated Windows 10 system disk might be home to more than 150,000 files and 90,000 folders. A more complex, application-heavy system disk might contain between half a million and a million files. That’s a lot of files!
Indeed, not all those files need be kept around. Thus, it’s a good idea to practice disk hygiene on a regular schedule. That’s exactly what’s explained and explored here, with plenty of examples and screen shots to illustrate the cleanup process. Best of all, the tools that’ll help you tidy up won’t cost you a dime.
Step 1: Run Disk Cleanup or “Free up space now”

From time immemorial, Windows has included a utility for cleaning up disk space — namely, Disk Cleanup, a.k.a. cleanmgr.exe. In Windows 10, users gained a second method to clean up disk space, part of its Settings-based “Storage Sense” facility, which is aimed at optimizing storage in Windows 10. Though there has been speculation that the first method might disappear as a result, the Disk Cleanup utility remains ready, willing and able to work even in the latest 19H1 Insider Preview (Build 18317) as I write this story. Either approach provides a great way to clean up extraneous and unneeded Windows 10 files.
To launch Disk Cleanup, type disk or cleanmgr.exe into the Start menu search box. Either way, the Disk Cleanup desktop app should appear at the top of those search results. Be sure to right-click the program and select Run as administrator from the resulting pop-up menu. Why? Only then will it offer to clean up redundant or outdated OS files (such as old OS files after an upgrade, or old updates) as well as other Windows leftovers. After Disk Cleanup scans your system, this screencap shows a reasonable facsimile of what you’ll see when it fires up:
The venerable Disk Cleanup utility helps you find and delete unwanted files.
You’ll want to scroll through the checkbox items in the pane labeled “Files to delete:” and pick stuff you’d like to get rid of. The numbers in the right column indicate how much disk space each item occupies. Don’t delete old OS versions or updates if you think you might want to roll back to earlier versions. Note also that the Downloads item represents the contents of your personal Downloads folder, so don’t delete it unless you’re sure you don’t need anything in there.
The second built-in cleanup option comes from Windows 10’s Settings app. If you click Settings > System > Storage > Free up space now, the system runs a scan. Once that scan is complete, you’ll find yourself facing options like the ones in the screen capture below:
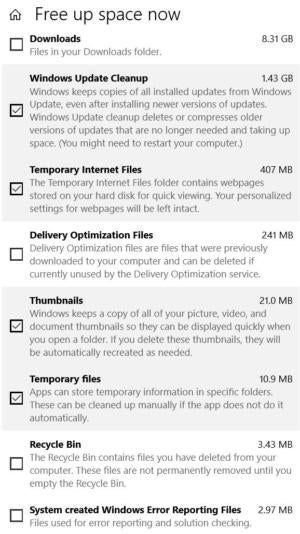 The boxes you see checked represent the default selections that Windows 10 marks for deletion when you run this utility. Note that it does not select the Recycle Bin (which contains stuff that is usually desirable for cleanup) by default.
The rest of the checked items are usually worth losing, including various kinds of temporary files, upgrade log files, graphics files, and so forth. The figures on the right show how much disk space you can regain by deleting each item.
In August 2018, Microsoft quietly announced that it would deprecate Disk Cleanup but keep it available “for compatibility reasons.” Personally, I don’t think the company will ever do away with it because the Settings > Free up space tool is an available alternative. That’s because many Windows admins and power users run cleanmgr.exe at the command line with a variety of switches and settings that this user-friendly UWP app cannot match.
Unless and until Microsoft offers a command-line alternative to cleanmgr.exe that can do what that tool currently does in scripts and batch files very well, I firmly believe that Disk Cleanup will remain part of modern Windows OSes. Only time will tell, of course. We’ll see!
Whichever tool catches your fancy, you should use it at least once a month for cleanup, if not more often than that.
Step 2: Use UnCleaner to catch what built-in tools miss

Josh Cell is a Francophone developer in Canada who’s built a peachy and free utility called UnCleaner. It is able to ferret out and remove temporary and obsolete log files that even Windows’ built-in utilities don’t catch and kill. You can download the latest version of UnCleaner (1.7) from Major Geeks.
Running on a production PC upon which Disk Cleanup just ran, here’s what UnCleaner finds to clean up:
Note that it finds over 400MB of files to clean up, even on a supposedly clean system. All you have to do is click the Clean button in the lower left part of the screen, and it will delete any of the files it’s flagged that aren’t locked to some running Windows process. You’ll never get this utility to remove everything (because something’s always locked by runtime constraints). But you’ll often see a status message that says “Good. Your system is very clean.”
Step 3: Drop obsolete device drivers with DriverStore Explorer
DriverStore Explorer (RAPR.exe) is a free, open-source tool that you can download from GitHub. Always be sure to grab the most current release (0.9.39 as of this writing). Unless you’re a real Windows driver wizard, you need only click two buttons to make RAPR do its thing: Select Old Drivers and Delete Package.

You’ll need to run RAPR in administrator mode (right-click its icon and select Run as administrator). When you start it up, you’ll see a list of installed drivers with checkboxes. Click the Select Old Drivers button at the top right of the screen, and the program will automatically check the boxes for the older driver versions it finds.
Click the Delete Package button, and RAPR will do away with the older drivers. The utility won’t delete any drivers that are currently in use, so even if this usually safe cleanup method picks an active driver, RAPR won’t delete it unless you click the Force Deletion checkbox. Power users and experts can find a lot more for RAPR to do, but most regular users will simply enjoy its ability to clean up old, outmoded drivers.
Notice in the screenshot above that the program picks two older Nvidia drivers when that button is clicked, for a potential space savings of 1.5GB or thereabouts. Once you use this tool a time or two, space savings will seldom be much larger, but first-time users may recover 3 to 5GB when they clean up numerous driver files. On especially cruft-laden systems, I’ve used to this tool to recover 7 to 10GB.
Step 4: Use DISM to clean the Component Store

Most Windows OS files reside in the WinSxS folder, also known as the Component Store. Each time you install a cumulative update, and sometimes after other updates, the Component Store will contain duplicate, obsolete, or orphaned elements. You can use the Deployment Image Servicing and Management (DISM) tool at the command line to check the Component Store from time to time. Such checks will tell you if a cleanup is needed.
To get started, you’ll need to open an elevated PowerShell window. On the Windows desktop, type the Windows key and, then select Windows PowerShell (Admin) from the resulting pop-up menu. (Alternatively, you can type powershell into the Start menu search box, then right-click Windows PowerShell and select Run as administrator from that pop-up menu.) In the Administrator: Windows PowerShell window that appears, type this string and hit enter:
dism /online /cleanup-image /analyzecomponentstore
You’ll see something like this:

As I wrote this story, I had just installed a Cumulative Update and other update items earlier that week. Sure enough, /analyzecomponentstorereported that there were three reclaimable packages ready for cleanup. Notice that the response text reported “Yes” in the field labeled “Component Store Cleanup Recommended.” That’s your clue that DISM has something it can clean up on your behalf.
To make that happen, in the Administrator: Windows PowerShell window, type this string:
dism /online /cleanup-image /startcomponentcleanup
After the cleanup operation, I analyzed the component store once again. This lets you do the math on the before and after /analyzecomponentstore outputs. This time, cleanup saved more than 0.71GB of space for the actual on-disk size of the component store. Most of these savings come from reduced backups and disabled features (0.7GB) — a good cleanup maneuver and result. Some updates may remove three or more reclaimable packages. (This one removed three.) Recently updated systems may recover up to 3GB using this technique, depending on the number and size of reclaimable packages removed.
Step 5: Inspect the system drive with WinDirStat (or equivalent)
Once all preceding cleanups are complete, it’s a good idea to inspect the system drive to see where the big files are. I use the free, open-source WinDirStat program, but TreeSize Free is a worthy alternative. These programs produce graphical renderings of disk contents that make it easy to spot big files and folders.
Here’s what WinDirStat shows for my production PC’s system drive:

The diagram in the bottom window places colored rectangular blocks to show a schematic for entries in the scanned drive’s file system. This kind of diagram is called a treemap and organizes files by disk and folder hierarchy, where the size of a given block shows how much disk space each file consumes. For the big blue box outlined in white at the top left of the diagram, the legend at the lower left says it’s an event trace log file (file extension: etl).
Remember, you’re looking for big files, because getting rid of them provides useful, quick wins in the disk space recovery game. Right here, I see that the boot log (.etl file) I ran yesterday on my system to try to figure out where the time was going left a HUGE (49.2GB) file behind. I’ve finished with that analysis and don’t need the file anymore, so getting rid of it regains me nearly 50GB of disk space in one fell swoop. Yes!
By clicking other “big blocks” in the treemap, you can quickly figure out where your biggest potential space recovery opportunities lie. You won’t be able to get rid of all of them — the paging and hibernation files must stay, for example (green blocks at lower center) — but if some of them can go, big space savings will result.
Practice makes perfect
If you make these cleanups periodically (I shoot for at least once a month), you’ll be able to keep your space consumption under much better control. Try this regimen out for yourself, and you’ll soon see what I mean. And don’t forget to slog through the Users folder (especially your account subfolder) from time to time, too, because junk also tends to accumulate there.
Enjoy your clean machine!
Attributed to: www.computerworld.com | Ed Tittel